
Payment Portal Settings
The Payment Portal lets operators accept payments for voucher-based access. Guests select a payment plan, pay through Stripe or PayPal, and receive their voucher credentials automatically. Only one payment provider can be active at a time.You can access these settings from Voucher Manager > Settings > Payment Portal Settings.
For the complete Paid Access setup, see Enabling Paid Access.
Note: Stripe payments are available from WAVER OS 2.4.1.
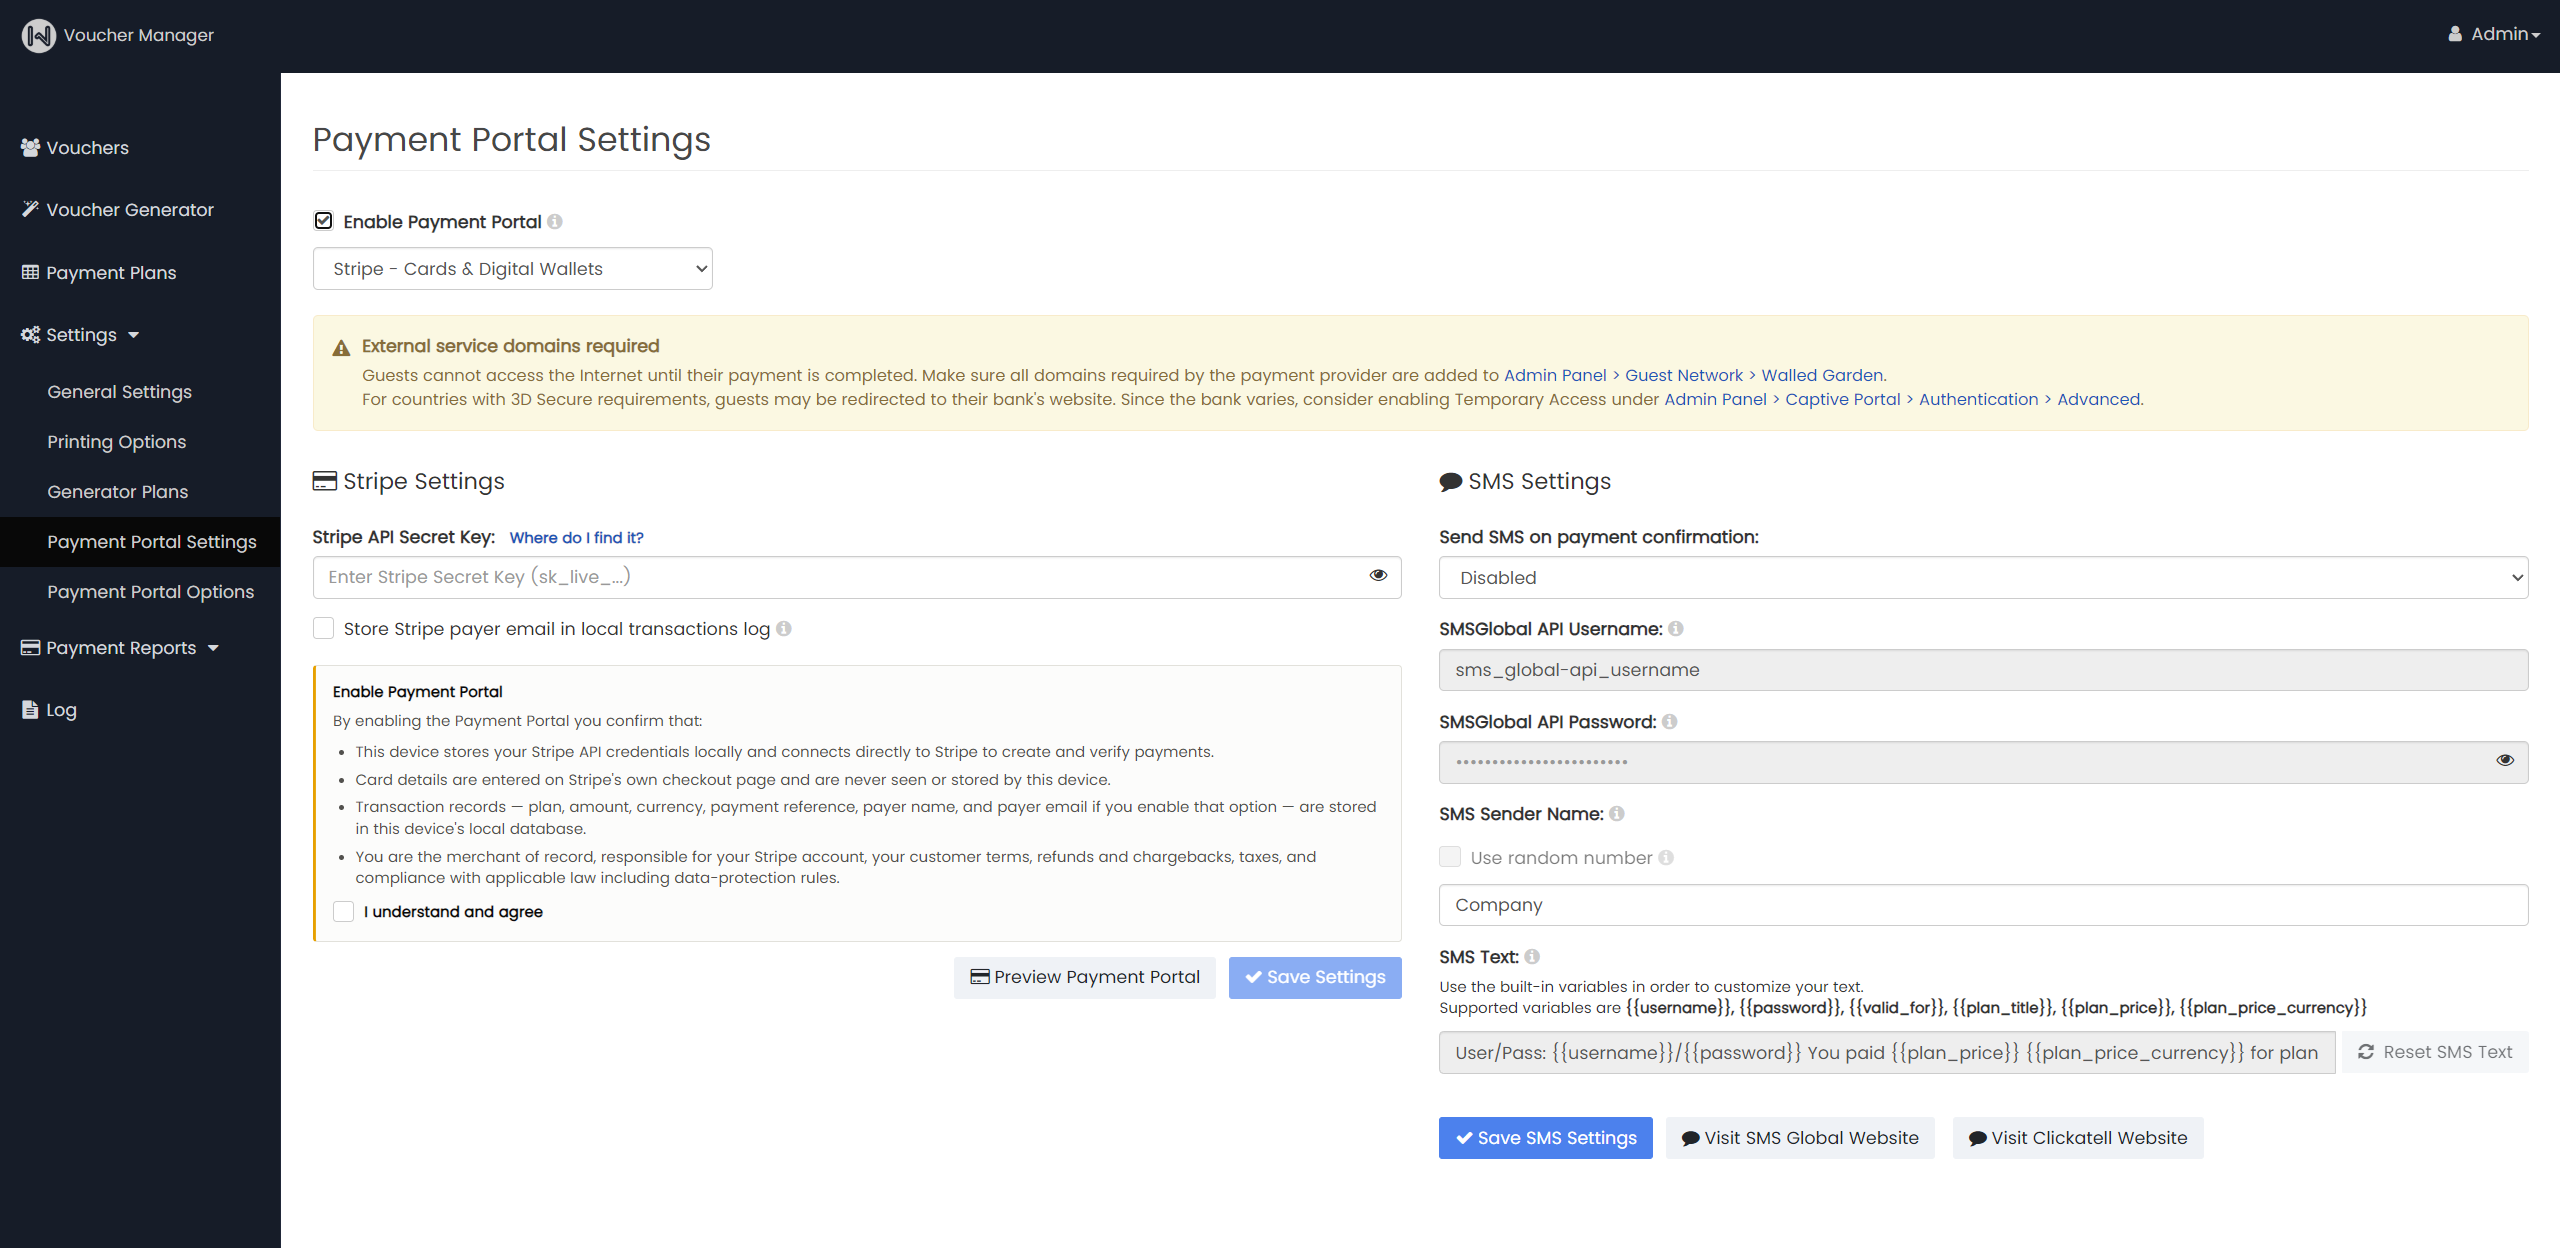
Payment Provider
- Enable Payment Portal: Check this option to allow guests to purchase access vouchers through the Captive Portal.
- Payment Provider: Select the provider that will process payments:
- Stripe – Cards & Digital Wallets: Guests pay by credit/debit card or a digital wallet, such as Apple Pay or Google Pay, on Stripe's secure checkout page. Requires a Stripe account activated for live payments.
- PayPal – PayPal Checkout & Cards: Guests pay through PayPal checkout. Requires a PayPal Business account and valid PayPal app credentials.
External Service Domains
When the Payment Portal is enabled, an External service domains required warning is displayed. Guests have no Internet access until their payment is completed, so the payment provider's pages must be reachable before authentication.
- Walled Garden: Add all domains required by your payment provider to Admin Panel > Guest Network > Walled Garden. If a required domain is missing, the checkout page may not load or the payment may fail.
- 3D Secure: In countries with 3D Secure requirements, guests may be redirected to their bank's website to confirm the payment. Because the bank differs for each guest, its domain cannot be added in advance. Consider enabling Temporary Access under Admin Panel > Captive Portal > Authentication > Advanced.
Stripe Settings
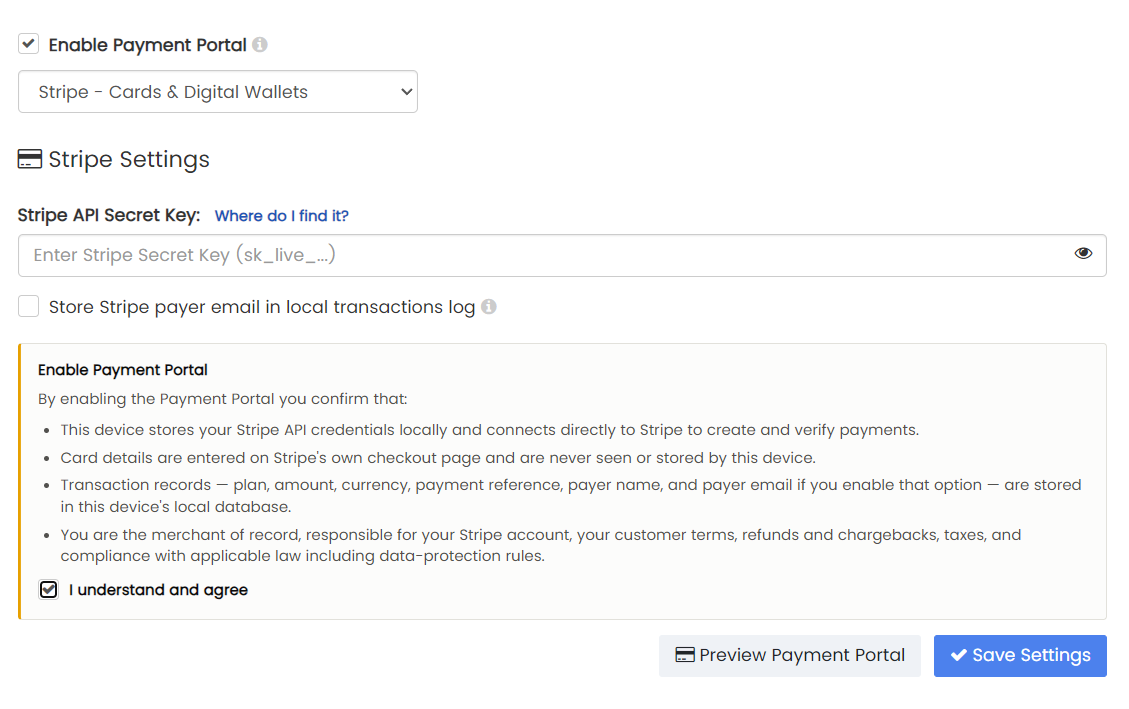
- Stripe API Secret Key: Enter the live Secret Key from your Stripe account (starts with
sk_live_). You can find it in the Stripe Dashboard under Developers > API keys, or click Where do I find it? for instructions. Use the eye icon to show or hide the key. - Store Stripe payer email in local transactions log: When enabled, the email address the guest enters at Stripe checkout is saved with the transaction record. If you enable this option, make sure your Privacy Policy mentions it.
PayPal Settings
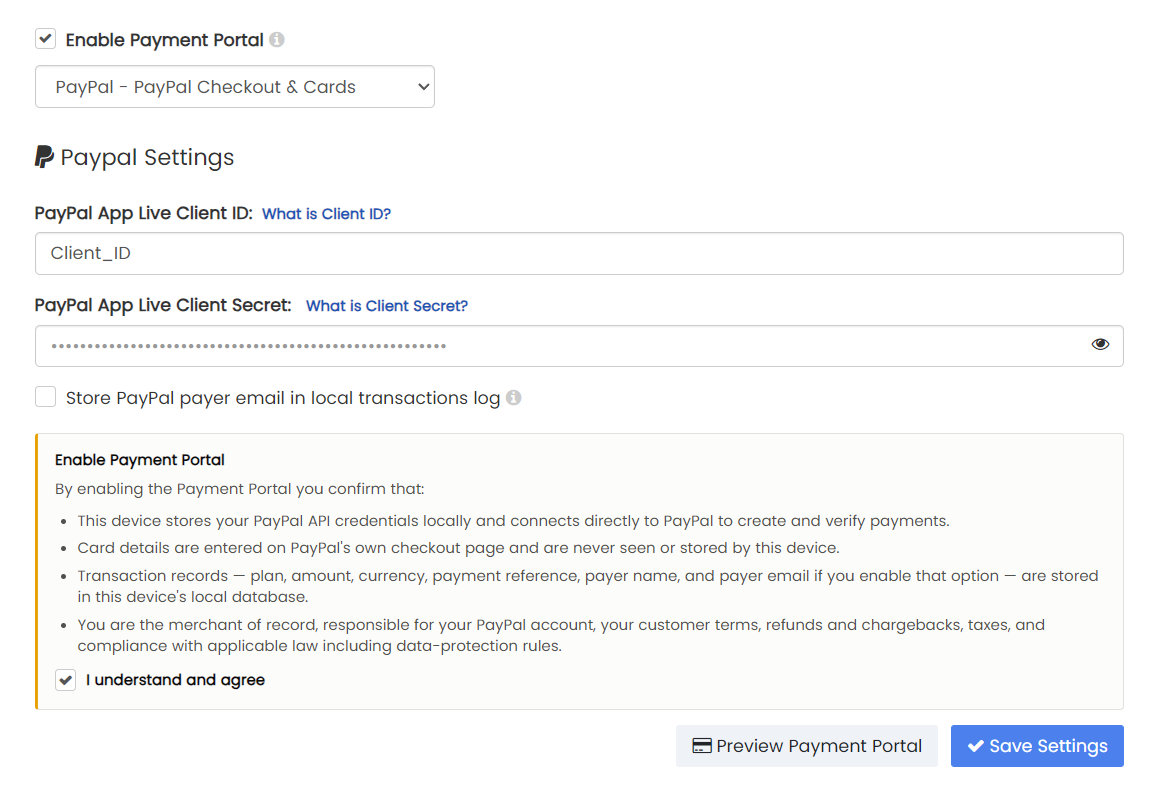
- Store PayPal payer email in local transactions log: When enabled, the payer's PayPal email address is saved with the transaction record. If you enable this option, make sure your Privacy Policy mentions it.
- PayPal App Client ID & Secret:
- Client ID: Enter your Live Client ID obtained from your PayPal application. This identifier links the Payment Portal with your PayPal account.
What is Client ID? - Client Secret: Enter your Live Client Secret, as provided by PayPal.
What is Client Secret?
- Client ID: Enter your Live Client ID obtained from your PayPal application. This identifier links the Payment Portal with your PayPal account.
Confirmation and Saving
Before the settings can be saved, you must review the Enable Payment Portal confirmation box and check I understand and agree. By confirming, you acknowledge that:
- The device stores your payment provider's API credentials locally and connects directly to the provider to create and verify payments.
- Card details are entered on the provider's own checkout page and are never seen or stored by the device.
- Transaction records, including plan, amount, currency, payment reference, payer name, and payer email (if enabled), are stored in the device's local database.
- You are the merchant of record. You are responsible for your payment provider account, your customer terms, refunds and chargebacks, taxes, and compliance with applicable law, including data protection rules.
Then:
- Save Settings: Click Save Settings to apply the changes. The button becomes available after you check I understand and agree.
- Preview Payment Portal: Click Preview Payment Portal to see how the payment interface will appear to guests.
SMS Settings
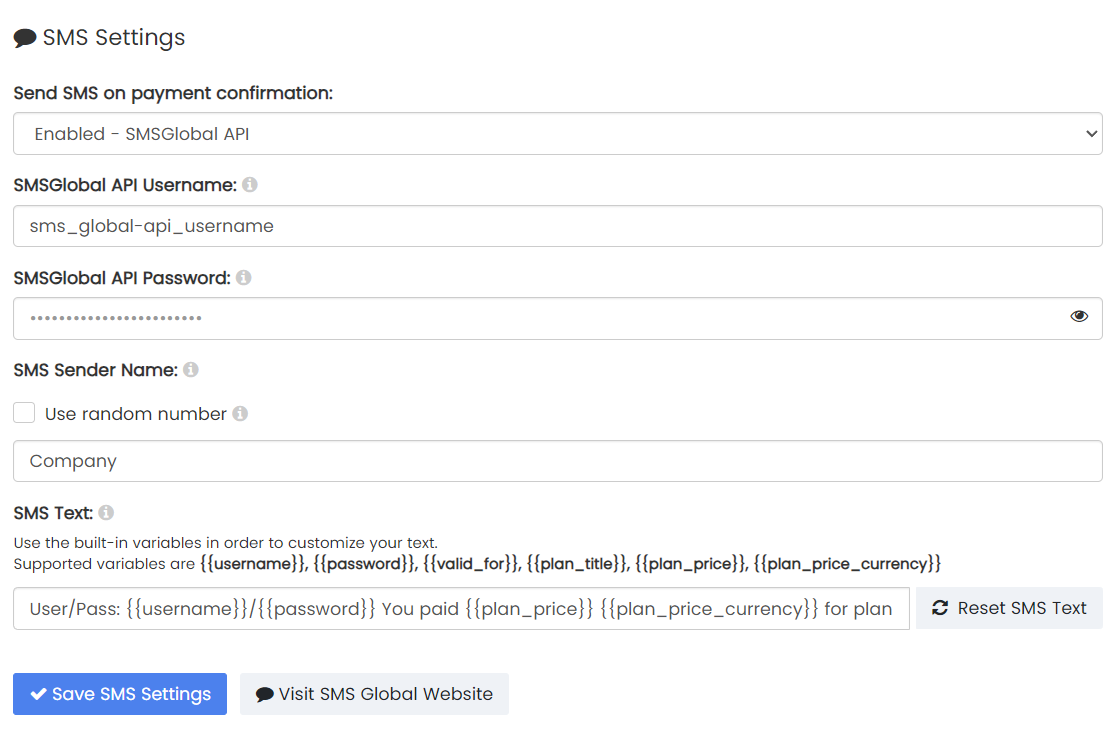
- Send SMS on payment confirmation: Select the SMS service used to send voucher credentials after a successful payment:
- Disabled: No SMS will be sent.
- Enabled - SMSGlobal API: Use the SMSGlobal API to send SMS.
- Enabled - Clickatell API: Use the Clickatell API to send SMS.
- SMSGlobal Settings:
- SMSGlobal API Username: Enter your SMSGlobal API username.
- SMSGlobal API Password: Enter your SMSGlobal API password.
- SMS Sender Name: Set the sender name for the SMS message. In some countries, the sender name must be registered with SMSGlobal.
- Use random number: Enable this option to send SMS from a virtual number. This is important in countries that block unregistered sender names.
- Clickatell Settings:
- Clickatell API Secret: Enter your Clickatell API secret.
- From Name: Optionally define the SMS sender name. Leave it empty if you do not want to specify one.
- SMS Text: Customize the SMS message guests receive after payment, using the following variables:
{{username}}: Voucher username{{password}}: Voucher password{{valid_for}}: Duration of the plan{{plan_title}}: Name of the plan{{plan_price}}: Price of the plan{{plan_price_currency}}: Currency of the plan price
User/Pass: {{username}}/{{password}} You paid {{plan_price}} {{plan_price_currency}} for plan {{plan_title}}, valid for {{valid_for}}. Thank you! - Reset SMS Text: Click Reset SMS Text to restore the default message.
- Save SMS Settings: Click Save SMS Settings to apply the SMS configuration.
- Visit SMS Global Website / Visit Clickatell Website: Open the provider's website to create an account or find API setup details and service availability.
⚠️ IMPORTANT NOTES:
- Payment processing is performed exclusively by third-party providers (Stripe or PayPal). No credit card data is stored or processed by the WAVER device.
- Test before going live: After configuring the Payment Portal and Walled Garden, complete a real payment from a guest device to confirm the full flow works.
- Keep API credentials confidential. If a key or secret may have been exposed, regenerate it in your provider's dashboard and update it on this page.
- Operators are responsible for configuring payment options and SMS notifications, and for ensuring compliance with applicable payment, telecommunications, and data protection regulations.